Our Location
304 North Cardinal St.
Dorchester Center, MA 02124

Written by Mike Reynolds – Former licensed electrician and lead installation consultant for Havenseek Lighted Medicine Cabinets, served 800+ clients across North America, with over 12 years of hands-on experience completing 1,200+ bathroom fixture installations. This guide is distilled from real-world field work, not just theory.
Staring at your dated, dim bathroom and dreaming of the clear, bright illumination from a modern lighted medicine cabinet? That dream is often crushed by a wave of anxiety. “What if I get shocked?” “What if I hit a pipe?” “What if it falls off the wall?” I’ve heard these fears a thousand times. That’s exactly why this guide exists. Forget vague tutorials; this is a field-tested, safety-obsessed blueprint that will walk you, step-by-step, through how to replace a medicine cabinet with a new, gorgeous lighted version. By the end, you won’t just have a new fixture—you’ll have the confidence that comes from doing it right. This is the only guide you need to read.

Rushing into this project is the single biggest mistake. This stage is about gathering intelligence on your bathroom’s “infrastructure.” Skipping it is like building a house without checking the land. The goal for your new medicine cabinet with lights is a perfect, safe, and lasting fit.
Nothing kills momentum faster than stopping mid-job to run to the hardware store. Use this checklist as your shopping list. I’ve separated “Absolute Must-Haves” from “Pro-Recommended” tools that make life easier.
| Tool/Material | Category | Why You Need It |
|---|---|---|
| Non-Contact Voltage Tester | MUST-HAVE | Your primary life-saver. Confirms wires are dead BEFORE you touch them. |
| #2 Phillips Screwdriver | MUST-HAVE | For removing old screws and installing new ones. |
| 4-ft Level | MUST-HAVE | Ensures your cabinet is perfectly horizontal. Crooked is unacceptable. |
| Drill/Driver & Drill Bits | MUST-HAVE | For pilot holes and driving screws into studs or anchors. |
| Wire Strippers & Cutters | MUST-HAVE | For preparing electrical wires for safe connections. |
| Wire Connectors (Wire Nuts) | MUST-HAVE | To securely join electrical wires. Get the correct size for your wire gauge. |
| Electrical Tape | MUST-HAVE | To wrap wire nuts for an extra layer of safety and security. |
| Stud Finder | RECOMMENDED | Locates wooden wall studs for the strongest possible mount. |
| Drywall Saw / Jab Saw | RECOMMENDED | If you need to slightly enlarge the wall opening. |
| Painter’s Tape & Pencil | RECOMMENDED | For marking drill points and layout lines without damaging walls. |
This is where DIYers get surprised. You need to know what’s behind that drywall.
Your new lighted medicine cabinet must be a match for your space and skills.
With power confirmed OFF, you can begin disassembly. Work slowly to avoid damaging the wall, which will make your new installation harder.
Now, assess the opening. Remove any old caulk or adhesive. If the drywall edges are crumbled, you may need to patch small sections. The goal is a clean, stable surface for your new medicine cabinet with lights to mount against. This is also the time to check if the existing electrical box is in good condition and properly secured.
This phase determines whether your cabinet feels flimsy or feels like part of the house. We are building a foundation that will hold significant weight for decades.
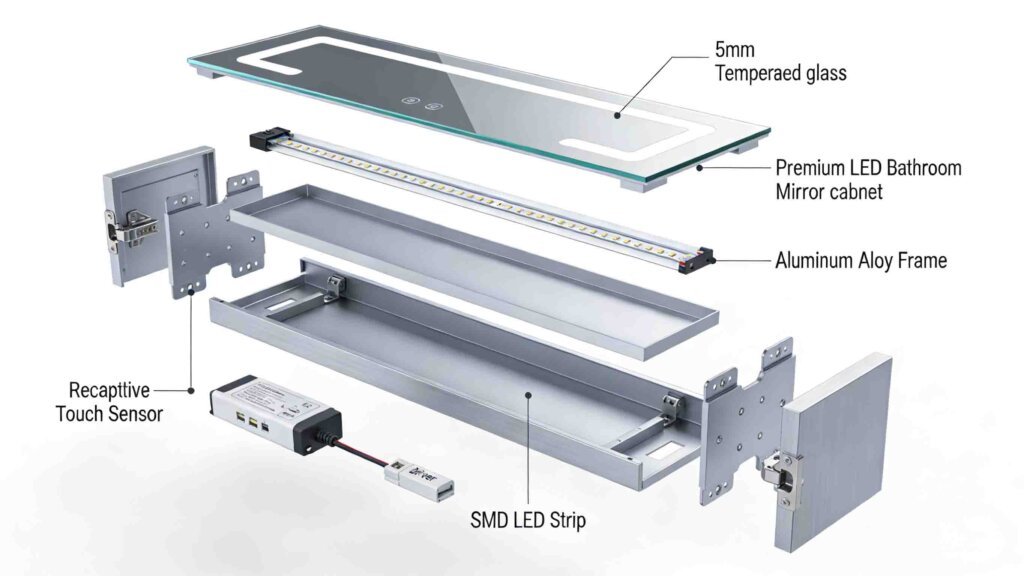
Most high-quality lighted medicine cabinets use a metal mounting bracket. This is the single most important piece.
This is the rewarding “big reveal” moment. With the bracket secured, carefully lift the new lighted medicine cabinets and hook it onto the bracket. You should hear or feel a solid engagement. Have your helper steady it. Inside the cabinet, there will be additional screws (often at the top) that you must drive into the bracket to permanently lock the cabinet in place. Do not skip these!
Pay attention. This is the most critical part of the entire guide. A poor wire connection causes flickering lights, failed components, or a fire hazard.
In a standard US setup, you’ll see three wires coming from the wall:
Your new medicine cabinet with lights will have corresponding wires, often labeled or color-coded the same way.
DO NOT put the back cover on yet! Go back to the circuit breaker and turn the power back ON. Return to the bathroom and flip the light switch or touch the sensor (if your cabinet has a touch switch). The lights should turn on perfectly. If they don’t, turn the power OFF again and re-check every connection. Once confirmed working, turn the power OFF one final time to secure the back cover.
You’re on the home stretch. These final steps ensure longevity and a professional look.
Bathroom steam is the enemy of drywall and cabinetry. Apply a thin, continuous bead of high-quality mold-resistant silicone caulk along the top and sides where the cabinet meets the wall. Smooth it with a damp finger for a clean, waterproof seal. This prevents moisture from creeping behind the cabinet.
Install any mirrors, doors, and interior shelves according to your cabinet’s manual. Now, turn the power ON for the final time. Test all features: the main lights, side lights, defogger (if equipped), and outlet (if equipped). Take a moment to appreciate the dramatic transformation.
To keep your lighted medicine cabinets looking and working like new:
You’ve just absorbed a masterclass in safe installation. For large-scale projects, custom-sized lighted medicine cabinets, or if you’d simply prefer a guaranteed professional result, the Havenseek Mirror team is here. Our experts handle everything from specification to final installation.
Get a Free, No-Obligation Project Consultation & Quote Within 12 Hours.Request Your Free Professional Quote Now
Typically, a simple like-for-like replacement where you’re using existing wiring does not require a permit. However, if you are running new electrical circuits, altering the wall structure significantly, or if your local building codes are strict (especially for wet locations like bathrooms), a permit may be needed. Always check with your local municipal building department to be absolutely sure. When in doubt, getting a permit ensures your installation is inspected for safety.
If there’s no power, you have three main options: 1) Hire a licensed electrician to run a new circuit or extend an existing one from a nearby outlet or light switch. This is the safest and most permanent solution. 2) Choose a battery-operated lighted medicine cabinets, though these are less bright and require battery changes. 3) Use a plug-in model and run a discreet cord to the nearest GFCI outlet, which can be a tripping hazard and is often not the cleanest look. For a professional and safe result, Option 1 is highly recommended.
Flickering or failure to turn on usually points to an electrical connection issue. First, double-check that the circuit breaker is ON. Then, turn the power OFF again and reopen the cabinet. Inspect your wire connections (wire nuts). Ensure the black (hot) wires are tightly connected together, the white (neutral) wires are connected, and the ground wires (copper/green) are secured. Loose connections are the #1 cause. Also, verify that the wall switch (if used) is functioning. If the connections look good, the issue could be with the cabinet’s LED driver—contact the manufacturer (like Havenseek Mirror) for support.
A small gap is common and fixable. You have two professional options: 1) Install a ‘beauty ring’ or ‘escutcheon’ panel that comes with many cabinets or can be purchased separately. This flat panel covers the gap. 2) For a seamless look, patch the drywall around the new cabinet. Use drywall joint tape and compound to fill the gap, sand smooth, and repaint the entire wall section. This method is more labor-intensive but gives the most integrated, custom appearance.
Yes, but it requires special tools and care. You will need a carbide-tipped glass and tile drill bit to drill through the tile for your mounting screws. Drill slowly to prevent cracking the tile. Use a hollow wall anchor designed for tile or, ideally, locate the wall studs behind the tile for the most secure mount. The added thickness of the tile and adhesive may also require longer mounting screws, which are often not included with the cabinet. Always measure and plan before drilling.